June 4, 2026
How to Connect Notion and Webflow for Automatic CMS Sync
Set up SyncFlow to map Notion fields to Webflow CMS, enable auto-sync, and publish structured content without rebuilding pages.

If you write in Notion but publish in Webflow, SyncFlow is the cleanest way I’ve found to keep those two systems aligned without copy-pasting every field by hand. The setup is straightforward: connect both apps, map your fields once, then choose whether you want auto-sync or a manual push when a draft is ready.
This guide walks through the exact flow I’d use for a small content site or an ecommerce blog that needs structured pages.
What you’ll do
- Connect a Webflow site and a Notion workspace
- Map Notion fields to a Webflow CMS collection
- Turn on auto-sync or run manual syncs
- Verify that images, links, code blocks, and formulas come through correctly

1. Install SyncFlow and connect both accounts
Open SyncFlow and click Get Started. Connect your Webflow account first, then connect the Notion workspace that contains the database you want to publish from.
Expected result: SyncFlow can see your Webflow site and your Notion database, and you’re ready to map fields rather than recreate content by hand.
A practical tip: use one database per content type. I’ve seen people try to sync everything from one giant Notion table, and that usually makes the Webflow mapping harder than it needs to be.
2. Map Notion fields to Webflow CMS fields
The core step is matching the Notion database to the right Webflow CMS collection. SyncFlow supports a wide range of field types, including text, images, checkboxes, dates, and URLs, so this is the moment to decide which content should remain structured and which fields can stay freeform.

If your posts rely on categories, authors, hero images, or slug fields, map those deliberately. Don’t assume SyncFlow can guess the content model you want. Make the collection schema explicit first, then sync.
Expected result: each Notion property has a clear destination in Webflow, and the mapping screen reads like a one-to-one content model instead of a loose import.
If you are setting up a larger publishing system, this is the same planning stage I’d use in related workflows like keeping Notion and Webflow in sync without copy-pasting, setting up a Notion-to-Webflow sync without manual cleanup, mapping Notion databases to Webflow CMS without rebuilding pages, and turning Notion drafts into Webflow CMS posts with SyncFlow. The structure matters more than the sync button.
3. Choose how SyncFlow should update Webflow
After the mapping is in place, configure the sync behavior. SyncFlow lets you enable auto-sync so changes in Notion are pushed automatically, or you can keep the process manual until a draft is reviewed.
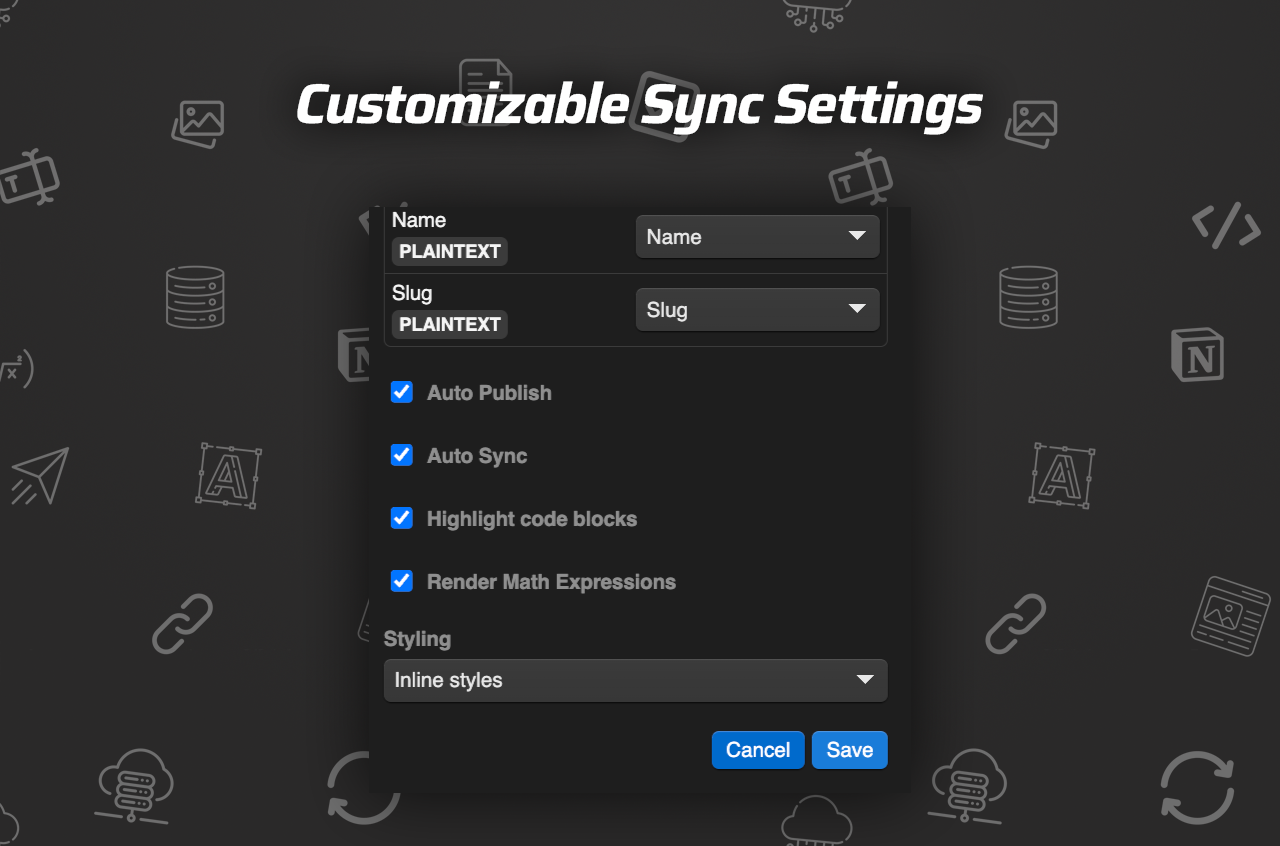
I would use auto-sync for evergreen content that changes often, and manual sync for posts that need a final editorial check. If your team writes long-form technical content, the manual path is safer until you trust the field mapping.
This is also where SyncFlow’s extra content handling is useful. According to the product brief, it supports page linking, code highlighting, and TeX rendering, which matters if your Notion docs include internal links, snippets, or formulas. Keep those features on only if you actually use them in your content.
Expected result: a new or edited Notion page updates the connected Webflow collection the way you expect, without extra formatting cleanup in Webflow.
4. Test one real page before you roll it out
Before you move an entire editorial calendar, create or edit one real Notion post and sync it through. Then check the Webflow CMS item and the published page.
Look for these four checks:
- The title and slug match
- Images arrive in the right place
- Links between pages still work
- The page looks correct on the published site, not just in the CMS editor
Expected result: the Webflow item looks like a faithful version of the Notion source, not a stripped-down import.
If the first sync looks off, fix the field mapping before you sync the rest of the database. That is usually faster than repairing a dozen broken CMS items later.
5. Troubleshoot the common failure points
The most common issues are boring, which is good news. They usually come from mismatched field types, an incomplete mapping, or content that looks fine in Notion but needs a more specific Webflow field.
Use this quick checklist:
- If an image is missing, confirm the Notion field is mapped to the correct Webflow image field.
- If links break, verify the linked pages exist in the same sync scope.
- If formatting looks wrong, decide whether inline styles or classes fit your Webflow setup better.
- If an older collection needs to match Notion exactly, use the full resync option instead of syncing item by item.
This is the point where SyncFlow’s demo posts and examples are worth reviewing, because they show how imported Notion blocks can look once they are rendered in Webflow rather than just copied into a blank field.
Where To Go Next
If you want a visual walkthrough, the product page also links to the full tutorial video and the SyncFlow trailer.
If you’re publishing on one Webflow site, the Standard plan is $8/month and includes 1 Webflow site install, unlimited syncs, unlimited databases, and unlimited connected fields. That makes it a reasonable fit if your main goal is to stop rebuilding the same content in two places.
The simplest next step is to map one Notion database to one Webflow collection, run a test sync, and verify the result before you scale it out.